The story of why the upgrade was required
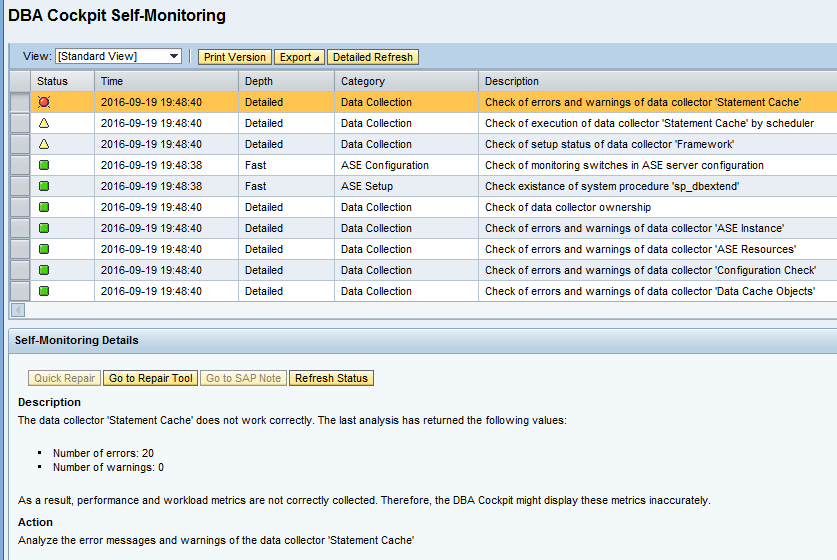
There was a retail client that had a system based in Red Hat and Sybase 15.7, the system gets migrated from a centralized to a distributed installation (I'm talking about prod here, and yes I said centralized installation) and few days after the migration the basis who performed (You can bet it was me) the migration was checking performance and general stuff of the system, went to the DBACockpit and when checking the statement cache a magical error appeared:
           **********************************************************
           Start of routine: saptools..SP_DBH_STMTCACHE (Log Level: 3)
           Statement has been rolled back. Transaction is unaffected.
           Error in job scheduling / execution (job exit code = 0; job user code = 1-)
           ***********************************************************
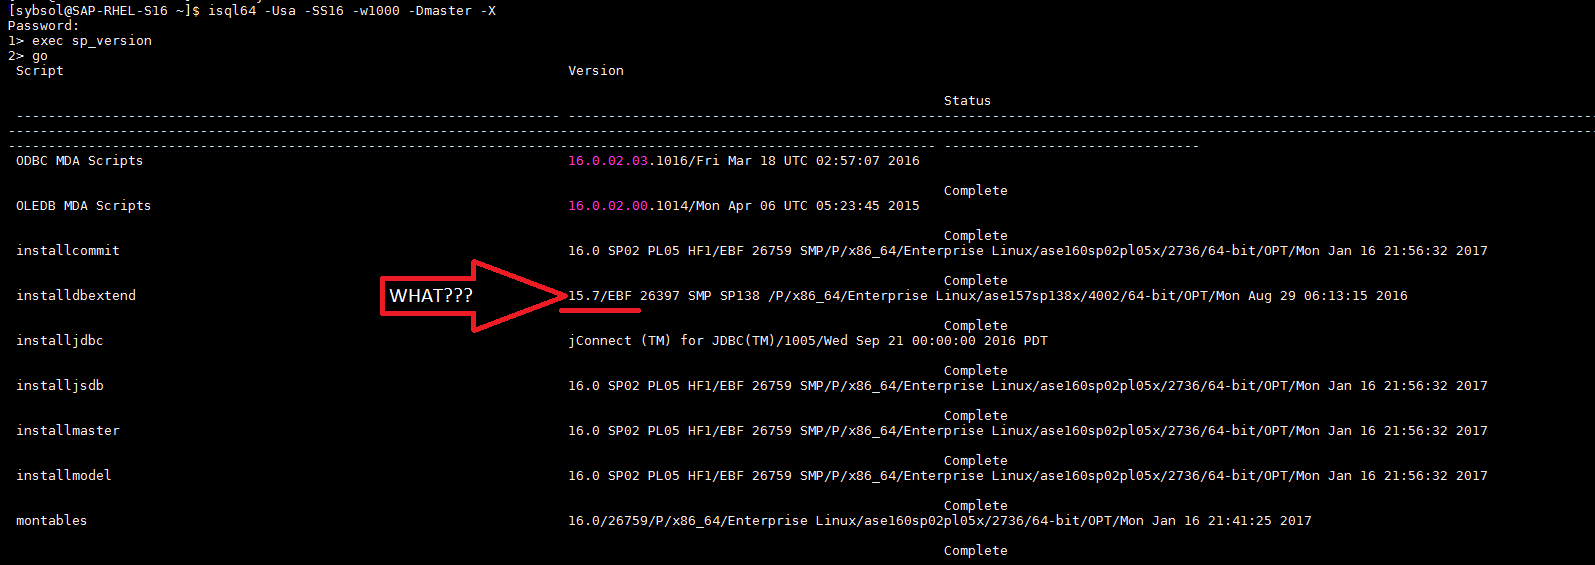
So we checked the collectors log and found:

What???
Yes, there was a problem with the statement cache collector, so I decided to get deeper and first check what was the procedure about, and I found the following:
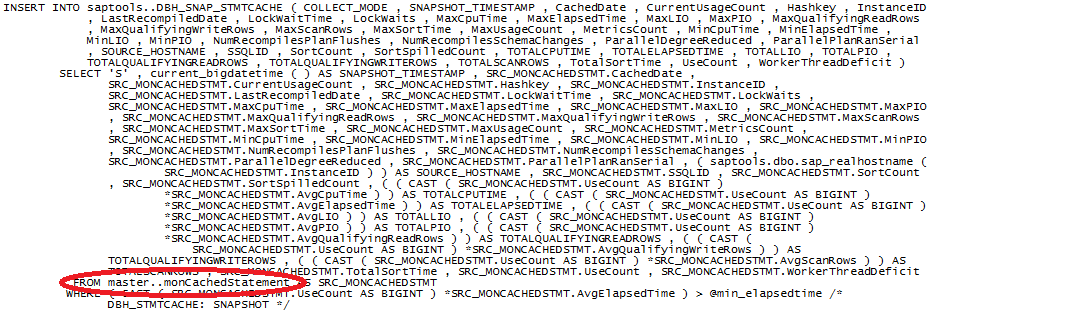
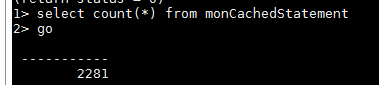
Then, knowing what was the table being used my first idea was to check how many rows are in there, and for my surprise I found the following:

So I thought... mmm... it could be me not knowing what is this table about and this could be normal. Do I have any other system where the statement cache collector is working? Yes I do indeed, DEV and QA work both just fine, so I got into the DEV system and executed the same query, again for my surprise:
This thing starts being interesting right here, and with this I just realize something is going on in prod. Next step? Let's check the marketplace, there could be a note there for me... and there was, note 2402937 talks specifically about this situation, but best part is the solution:
CR 804211 is fixed in:
    SAP ASE 16.0 SP02 PL06
The workaround was "decrease the statement cache size", but in our case that was not happening, this is a retail system, not the heaviest I've seen but still it transacts a lot and I was not messing with decreasing any caches (This system haw a very long history of performance issues).
Let's start planning the upgrade
So, at this point we proposed and got approved the "project" of upgrading the DB in the whole landscape, as always when a big activity like this (big activity / mini project) starts if there is an opportunity to create a lab (as close as prod as possible) and prepare a document based on that you'll be one step ahead, despite good vendor documentation each landscape and client is a different story one from each other, so normally you take vendor documentation as template that has to be adjusted to your needs.
The first thing I did was to look at the documentation or notes for the upgrade, and I fall in note 2162715 that is the main one for a major upgrade like this (Major because we are jumping from 15.7 to 16.0, for jumps between the same release it is would be a minor upgrade).
Again, I took that as a template and I identify the following initial steps:
- Media download
- Media preparation (Decompress, mount point and share creations)
Then, for each execution I identified the following (It varies from client to client, so this is an example based on this one):
- Stop PI channels
- Suspend jobs
- Shutdown SAP instance
- Backup of mountpoint /SYBASE/<SID>
- "SA" DB user unblock
- Sybase job scheduler shutdown
- Sybase backup server shutdown
- Installation of the new DB engine
- Upgrade of the existent DB engine
- Successful upgrade verification
- "SA" DB user block
- ODBC and JDBC libraries upgrade
- Job scheduler activation
- Backup server activation
- SAP System start and verification
- A whole restart of the system/server
- Final SAP system start, release jobs and start PI channels
That's a very high level overview of what does it take to perform the upgrade in this particular case, despite it is very high level it is a very good guide to coordinate the people and estimate when do they have to participate on the activity.
And as I'm telling the whole story we got the following teams involved due to that steps list:
- Linux administrators team
- Create the initial mount point/share for the media
- PI team
- Stop/start the chanels
- Basis
- Stop/start the system
- Suspend/release jobs
- DB administration and upgrade (In this particular client, for SAP instances Basis is the DBA team too)
- Backup team
- To backup the DB engine mount point when required
So, some premises/requirements going from the top to the bottom:
- Media download
- In our case we requested 15GBs to download and decompress the media, that was created as a mount point that was then shared through NFS to all systems were the upgrade was being performed. Take care when using NFS shares, by SAP it is not officially recommended to allocate media on a NFS share during the execution of the activity, and we followed that recommendation by temporally copying the media to a local mount point that we had on each system just to perform the activity with the media locally stored, and just after that the media gets deleted, the reason it is decompress and shared on a NFS share is because in this particular client we prepared a media catalog.
- Time window to perform the activity
- Based on a lab test in this particular client (And old sandbox we had around that was "similar" to production in terms of data volume) we determined that a window of 3 to 4 hours should be enough to perform the activity.
- Coordination
- I was coordinating the activity as the major impact was caused by us, we had a few other teams participating on the activities too, so to be neat I just created a really small and quick Gantt chart to provide the people with a visual reference of when were they needed at the activity.
- Backups
- The backup team ensured a few days before the activity that everything was ready to take a backup of that mount point at the time of the activity.
- Passwords
- I had to obtain the following passwords before the activity, as you could imagine these were stored on some password vault that I had no access till this project:
- SO users
- <sid>adm
- syb<sid>
- DB users
- sapsso
- sapsa
- SO users
- I had to obtain the following passwords before the activity, as you could imagine these were stored on some password vault that I had no access till this project:
- VNC
- Yep, you wouldn't guess that one but the Sybase installer requires an X display at some stage of the upgrade, the first lab test I performed failed due to no X display variable available so I had to mount a VNC session and take it from there (You can export the display through SSH if you want, I just don't want to take the risk that's why I use VNC). On all others execution I just did everything from the VNC session, easier and less risks.
- Accesses
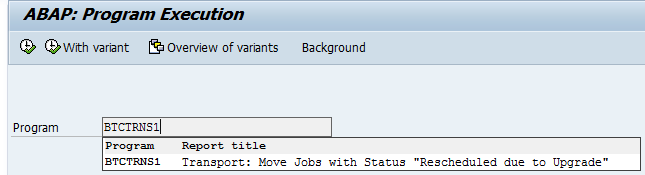
- If you don't have a wide role in production just ensure that you have enough access to execute report BTCTRNS1 (Suspend jobs) and BTCTRNS2 (Release jobs) and run the transactions you considered useful to check/monitor system health after the activity (SICK, SM21, ST22, SM66, ST03N, DBACOCKPIT, etc)
- Something I have not done on this activity but saw the recommendation somewhere else and I consider it a useful one for the future is to take some perf stats from the system, ST03 for example to compare the system performance before and after the upgrade, I know the perf data will still be there but it is not a bad idea to start working on that before actually getting into the upgrade.
Without further ado, getting into the upgrade itself
1. Media download
You will have to download two things
- Sybase 16.0.2.6 (ASEBS16002P06) installation media
- This will be the media used to perform the upgrade, it contains the engine itself
- Files syb_update_db.TXT and dbsrvresp_major.txt
- These files are attached to note 2162715, you will have to place them on the directory where the installation media got decompressed.
- dbsrvresp_major.txt is a response file for the installer, it is just a shortcut of what has to be selected during the installation, I encourage you to use this rather using the installer directly still you can mess on modifying it if you need so.
- syb_update_db.TXT is a SQL file, it is the file that is actually configuring your database just after the upgrade following a set of recommendations. For this particular one I recommend you to have a snapshot of the output of sp_configure taken before the upgrade, and then compare it on the lab just after the upgrade, you can and should modify this file as per your requirements, you can even add something to it if you want to merge a parameters change as part of the upgrade (However, don't go to far merging changes, if something goes wrong you will have more time invested looking into what caused the issue).
2. Media preparation
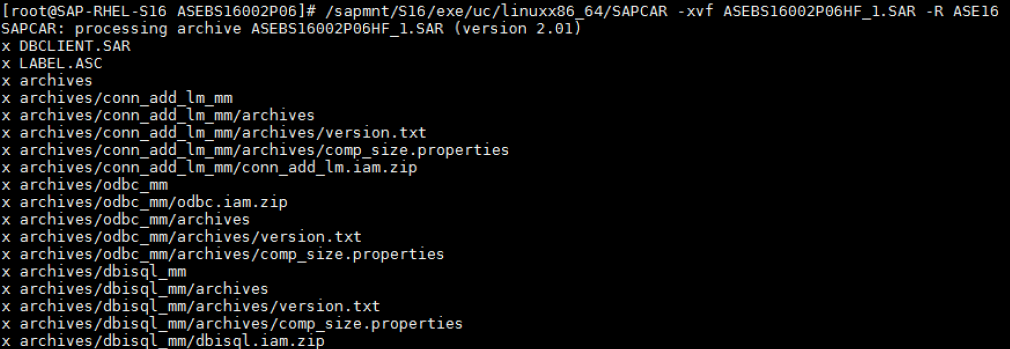
Once the installation media gets downloaded (to the mount point you prepared for this in advance), it should be decompressed, in our case we did it to /SAPCD/ASEB16002P06HG/ASE16 with SAPCAR, in my case I do normally like to specify the output directory, for example: /sapmnt/SBX/exe/uc/linuxx86_64/SAPCAR -xvf ASEBS16002P06HF_1.SAR -R /SAPCD/ASEBS16002P06HF_1/ASE16
Following the steps of the note, after decompressing the SAR the directory and its files should be owned by syb<sid>:sapsys with rights 750:

And at last, as you moved the files attached to the note to this directory change the ownership of those files too:

3. PI channels stoppage and jobs suspension
In our case the PI channels were being stopped by the PI team, I had been in a client were this was automated through some portal, in this case this was done through the PI administration just setting the channels to stopped.
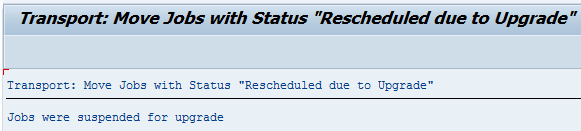
To suspend the jobs you can do it through the database or using the report BTCTRNS1 through SA38/SE38 (The official way to do this):
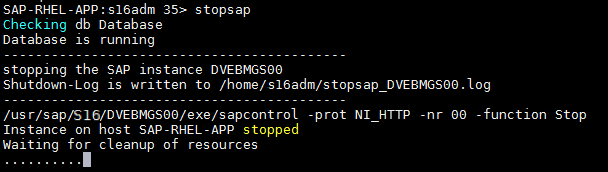
4. Stopping SAP
Nothing special here, just stopping SAP as you normally do, just ensure nothing is up after stopping the system, if the system is the only one installed there I even stop DAA and the sapstart services.
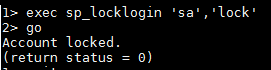
5. Unlocking "SA"
Next step is to get into the DB and unlock user SA, this can be done using the stored procedure "sp_locklogin" and it should be executed with sapsso. I'm used to maintain Sybase databases right from the command line so I get there with isql64 and unblock the user from there:

As you can see, the RC you should obtain from running that query is 0, otherwise something was not what you were actually expecting. You need this user to be unlocked before moving forward so do not continue if you were not able to unlock this user.
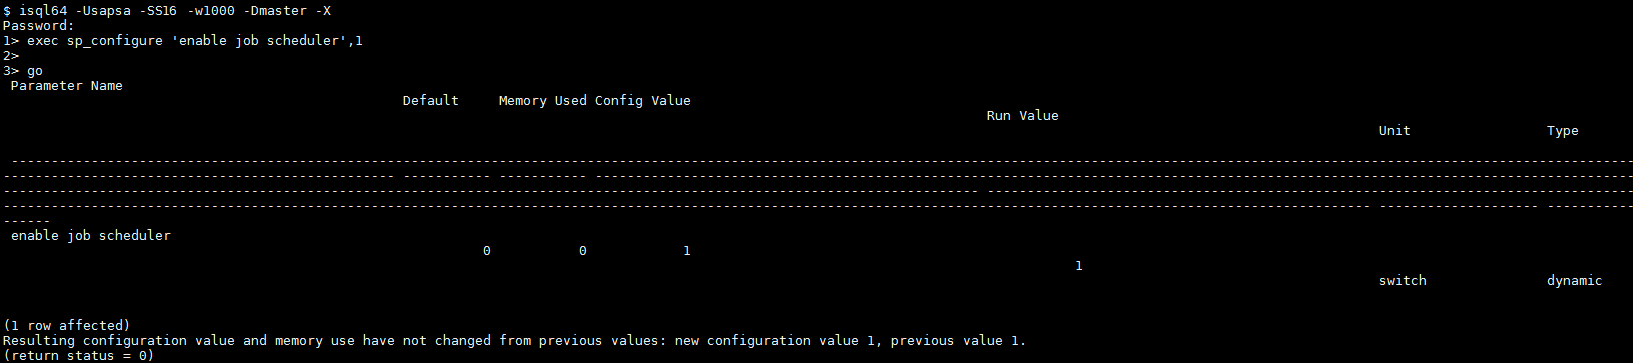
6. Stopping Sybase job scheduler, backup server and database engine.
Now the user is unlocked, SAP is stopped, media is ready and available, the only remaining steps before getting our hand dirty with the database upgrade is stopping both the job scheduler and backup server, and at last the DB.
The first thing to do is to disable the Sybase job scheduler so it does not get accidentally starting during the process, and to get this done the value of 'enable job scheduler' configuration parameter should be set to 0 using sp_configure, the query to change its value is:
exec sp_configure 'enable job scheduler', 0;
go;

Then the job scheduler is stopped using the stored procedure sp_sjobcontrol on the Sybase management DB (A.k.a sybmgmtdb), the following has to be executed as sapsa:

Then the backup server is stopped using "shutdown SYB_BACKUP"

Any now finally to stop the DB just use "shutdown"in Sybase.

7. Installing the new engine.
Before doing the real upgrade you'll have to install the new engine (then a different script will take care of the upgrade). Previous steps were fine to be executed through SSH, but at this point I hardly encourage you to create a VNC session and start working from there, the installer needs a display to be available, and exporting it through SSH is a possibility, however SSH connections get lost frequently, and you don't wanna risk this activity due that right?
Now that we are on the same page and you've created a new vnc session to work from there just go to the directory were installation media was decompressed a few steps ago and run as syb<sid> the installation using “./setup.bin -f /<Temporary_Folder>/dbsrvresp_major.txt -i silent -DUSER_INSTALL_DIR="${SYBASE}"” where <Temporary_Folder> is the folder were media was decompressed (You left the dbsrvresp_major.txt file there).

Once the installation gets completed, you will see a "The installation was successful" message. UPGRADE TIME!
8. Upgrade, this is what this article was all about
Running the actual upgrade starts all with one command "upgrade_bs_rdbms.sh" included on the installation media. It will basically upgrade the old engine with the new one and its execution is super easy, despite that it could fail (I had some) and normally that is due to something that is wrong due to human fingers touching non touchable places. Almost always you can correct whatever is wrong and rexecute from here, but I had one that required a restore because it was super stuck (There was probably a way to recover it, but that instance even not being a productive one was exposed to sensible people, so no risks on that one, restore, correct beforehand, execute the upgrade again).

Once it gets done with the upgrade you will realize as per the messages on the screen (If it fails you will realize the same way, but you will have to check trace files, sometimes it is a simple correction and sometimes you have to do some digging before understand which screw has to be adjusted):
9. Successful upgrade verification
Easy one, run sp_version and you will realize that everything was upgraded successfully, you have nothing else to do here:
Nothing is that easy in this town, so there are some components that are not automatically upgraded by the script, not a problem though, before upgrading that particular component first ensure that the $SYBASE_ASE variable was updated with the right version:
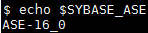
Okay, we are fine then, the variable was updated, main components of the engine were upgraded, let's deal with that dbextend.
Lucky you the DB generates scripts to upgrade the components that were left on the old version and those are located in "$SYBASE/$SYBASE_ASE/scripts/", you could get there or run the command from wherever you are, you will use -o to dump the screen output to a file so you can check the trace if something goes wrong. So, in our situation we have to upgrade the installdbextend script, and to that you will have to use:
isql -S<DBSID> -Usa -X -w 999 -i $SYBASE/$SYBASE_ASE/scripts/<installscript> -o <outputfile>”,
That means in our case it will be:
isql -SS16 -Usa -X -w 999 -i $SYBASE/$SYBASE_ASE/scripts/installdbextend -o /tmp/installdbextend.log

Easy peasy, once it gets completed check again with sp_version and you should find now that the component is now aligned:
And now that we got all that stuff there is only one remaining step to finish with the engine upgrade and that's running the syb_update_db.TXT script we downloaded from the note, also done the same the same way we upgraded the installdbextend component but using this file this time, you should use something lile:
isql -SS16 -Usa -X -w 999 -i ./syb_update_db.TXT -e -o syb_update_db.out
Once finished, you could check the .out file to ensure everything is right.
A couple verification you should consider before moving forward is to ensure that following variables have updated values:
- $SYBASE_ASE
- $SYBASE_OCS
- $SYBASE_WS
- $PATH
- $LD_LIBRARY_PATH
- $LIB
- $INCLUDE

And now we are really done with the engine upgrade.
10. "SA" DB user lock
As we did before but the opposite, lets unblock the "SA" user using sp_locklogin again.
The query to be used is:
sp_locklogin 'sa', 'lock'
And on the console looks like this:
11. ODBC and JDBC libraries upgrade
Now it is time to upgrade ODBC and JDBC libs, otherwise our SAP instance will not be able to communicate with the database.
To accomplish this step the SAR containing client libraries should be extracted to /sapmnt/<SID>/global/syb/<OS_PLATFORM>, for example:
SAPCAR -xvf ASEBC16002P04HF_1-20012477.SAR -R /sapmnt/S16/global/syb/linuxx64_64
Screenshot of our execution:

12. Job scheduler activation
Let's activate back the job scheduler to start moving toward the end of this activity.
Remember step 6 when we disabled the job scheduler there was a parameter modified that indicates if the job scheduler is enabled or not, and that parameter is 'enable job scheduler', as you can imagine if to disable it the value has been modified to 0 to enable it we do just the opposite, meaning its value should be 1, and this is done with the following query:
exec sp_configure 'enable job scheduler',1
go
And right after enabling the job scheduler we have to start it using sp_sjobcontrol:
exec sybmgmtdb..sp_sjobcontrol '','start_js'
go

You are now ready to take care of remaining steps that are about starting back the SAP system with startsap, doing your own health checks (Overall I would recommend SICK, SM21, ST22, SM50/51/66, DBACOCKPIT), stopping the whole system again and doing a full restart of the SO (highly recommended, simulate a normal restart so you are sure next time you restart the instance you'll have no surprises due to this upgraded), and then just after the restart you can release all jobs using report BTCTRNS2 and get your PI guys to start back PI channels.
When doing this in production plan some hypercare, not very extensive but keep an eye on the system a few days after the upgrade to ensure everything is running smoothly.