Installing iTop is nothing but easy, it is a super great ITIL based ticketing system with a CMDB embedded and its installation documentation is quite self explanatory while it describes all its dependencies under different scenarios.
With a colleague we often develop and test stuff on demo iTop instances before doing anything in productive instance of our clients, till a few weeks ago we were using some manually installed instances and snapshots in OpenNebula, but despite OpenNebula is amazing I decided that it is quite an overkill for most of our situations (Sometimes it is not)
Another great tool for this kind of environments is Vagrant, it is a local installed platform full of great features intended to automate the creation of test environments mainly for developers. I my mind it just looks like OpenNebula on a laptop (With the difference that OpenNebula can handle production environments and this... well, you know).
So combining that OpenNebula was quite an overkill and that Vagrant was a great alternative for fast locally deployed test environments I got my hands dirty and created a Vagrant file that contains the whole script to create an iTop unattended test environment installation with it.
The steps to create your own iTop local test instance using Vagrant are:
I assume you have vagrant installed, if you do not don't worry and stay tuned, I will be writing an article soon about that.
Create a directory wherever you want and clone this repository using git there.git clone https://github.com/nogardeht/vagrant-itop.git
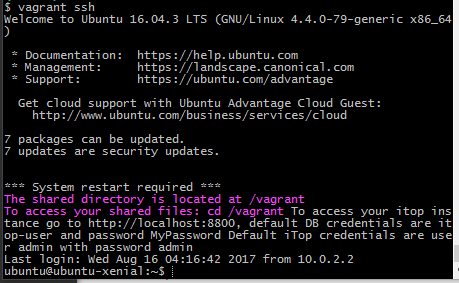
Read the README.md file as it contain some instructions (Basically, if you want demo data on this instance you will have to modify the file default-params.xml, and it has to be done before ever starting the virtual machine, otherwise you will have to destroy it and start it again)vagrant upIt will take some time as it has to do the classical update/upgrade of debian and ubuntu, then download all the dependencies and iTop itself and execute the installation. When it gets completed you will see something like this:
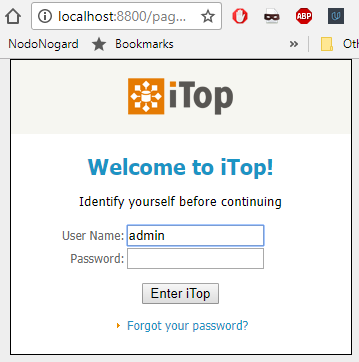
As the installation gets completed it will be as simple as getting with your local browser to localhost:8800 and login in with user admin and password admin:
If you have to modify anything at OS level you can get into the system using "vagrant ssh", just for your information the DB user is itop-user and the website (located at /var/www/html/) runs as per default with the www-data user.vagrant ssh
If you like this content please do not forgive to subscribe and also you can follow me on different social networks (Links at the bottom of the page).