It has been two months since I bought the FST-01 to store my GPG private keys, basically to test it, and also because I like the idea of storing the private keys in a separate device (I had some experience implementing smartcards for dual factor authentication, but never before with GPG certificates, so it is good to start testing how it works). Basically what happened is that as soon as I had it on my hands the first thing I did was writing some test certificates into it, and the tests were successful, till I tried to delete them to write the real certificates. After reading its documentation online just found that with the binary that was wrote on my FST-01 it was not possible to delete the certificates, and after trying different things I have also managed to get it locked, so I bought a ST-LINK/V2 clone interface to flash the FST-01 again and start from scratch (I have a bus pirate also, but I was looking around for 1 month on how to flash using SWD with it and I found one or two posts about that but I that but just decided to move forward through this path instead). I thought that with the ST-LINK/v2 the story was going to be different but... not that far as I was reading several posts for more than a week about how to use it specifically to flash the FST-01, and I found no clear articles about that, so I will try to summarize how I did it myself. So let's start with this, the first thing I did was installing the ST-LINK/V2 the right way, and for that it required me to add the following rule to the rules file in /etc/udev/rules.d:
ACTION=="add", SUBSYSTEM=="usb", ATTR{idVendor}=="0483", ATTR{idProduct}=="3748", GROUP=="tape", MODE="664", SYMLINK+="stlink"
I created then a file called 10-stlink.rule with that content. Before continuing with the second step (that is downloading OpenOCD) I downloaded and installed all the dependencies for this using the apt-get command (As there is an openocd package available on the repository, but I prefered to build it myself):
$ apt-get build-dep openocd
The second step was to download and correctly compile OpenOCD, so first I downloaded the latest available version at that time that was 0.8.0 from . After the decompression of the file, I executed the configure script with the following parameters to enable the compatibility not only for the ST-LINK/V2 clone interface but also for the Altera JTAG and the Bus pirate as those are the inferfaces I have at this moment:
$ ./configure --enable-buspirate --enable-stlink --enable-usb-blaster-2
Once the configuration was completed the following summary is printed to the screen confirming all the adapters that were configured:
OpenOCD configuration summary
--------------------------------------------------
MPSSE mode of FTDI based devices        yes (auto)
ST-Link JTAG Programmer                 yes
TI ICDI JTAG Programmer                 yes (auto)
Keil ULINK JTAG Programmer              yes (auto)
Altera USB-Blaster II Compatible        yes
Segger J-Link JTAG Programmer           yes (auto)
OSBDM (JTAG only) Programmer            yes (auto)
eStick/opendous JTAG Programmer         yes (auto)
Andes JTAG Programmer                   yes (auto)
Versaloon-Link JTAG Programmer          yes (auto)
USBProg JTAG Programmer                 yes (auto)
Raisonance RLink JTAG Programmer        yes (auto)
Olimex ARM-JTAG-EW Programmer           yes (auto)
CMSIS-DAP Compliant Debugger            no
That looks really good, so to compile and install just use the classical:, the consequent steps are usual:
$ make
$ make install
And then to confirm it was installed correctly:
$ openocd -v
Open On-Chip Debugger 0.8.0 (2014-08-16-00:24)
Licensed under GNU GPL v2
For bug reports, read
 http://openocd.sourceforge.net/doc/doxygen/bugs.html
Time to start working on compiling GnuK (not an easy task).
First thing to do is install some deps (probably bison and m4 are not required, but as those are considered part of the gnu toolchain I installed them) and clone the git repository with the source code:
$ sudo apt-get --force-yes -f install make gcc binutils-arm-none-eabi binutils bison m4 gdb gdb-arm-none-eabi autotools-dev autoconf automake libtool gcc-arm-none-eabi
$ git clone git://git.gniibe.org/gnuk/gnuk.git
Once the repository gets cloned locally, we also have to clone the chopstx submodule, for that first we move to the chopstx folder inside ./gnuk and then we update it:
$ cd ./gnuk/chopstx/
$ git submodule init
Submodule 'chopstx' (git://git.gniibe.org/chopstx/chopstx.git) registered for path '../chopstx'
$ git submodule update
Cloning into 'chopstx'...
remote: Counting objects: 456, done.
remote: Compressing objects: 100% (183/183), done.
remote: Total 456 (delta 317), reused 376 (delta 272)
Receiving objects: 100% (456/456), 157.20 KiB | 0 bytes/s, done.
Resolving deltas: 100% (317/317), done.
Checking connectivity... done.
Submodule path '../chopstx': checked out 'f344d926c1afafb9368a19e45db40fc312928a3c'
Finally, our objective... compiling the binary for our FST-01:
$ cd ./gnuk/src
$ ./configure --vidpid="234b:0000" --target="FST_01" --enable-certdo --enable-keygen
Header file is: board-fst-01.h
Debug option disabled
Configured for bare system (no-DFU)
PIN pad option disabled
CERT.3 Data Object is supported
Key generation on device is supported
Card insert/removal by HID device is NOT supported
$ make
And creating the elf from the bin generated by the compiler:
$ arm-none-eabi-objcopy -O binary build/gnuk.elf build/gnuk.bin
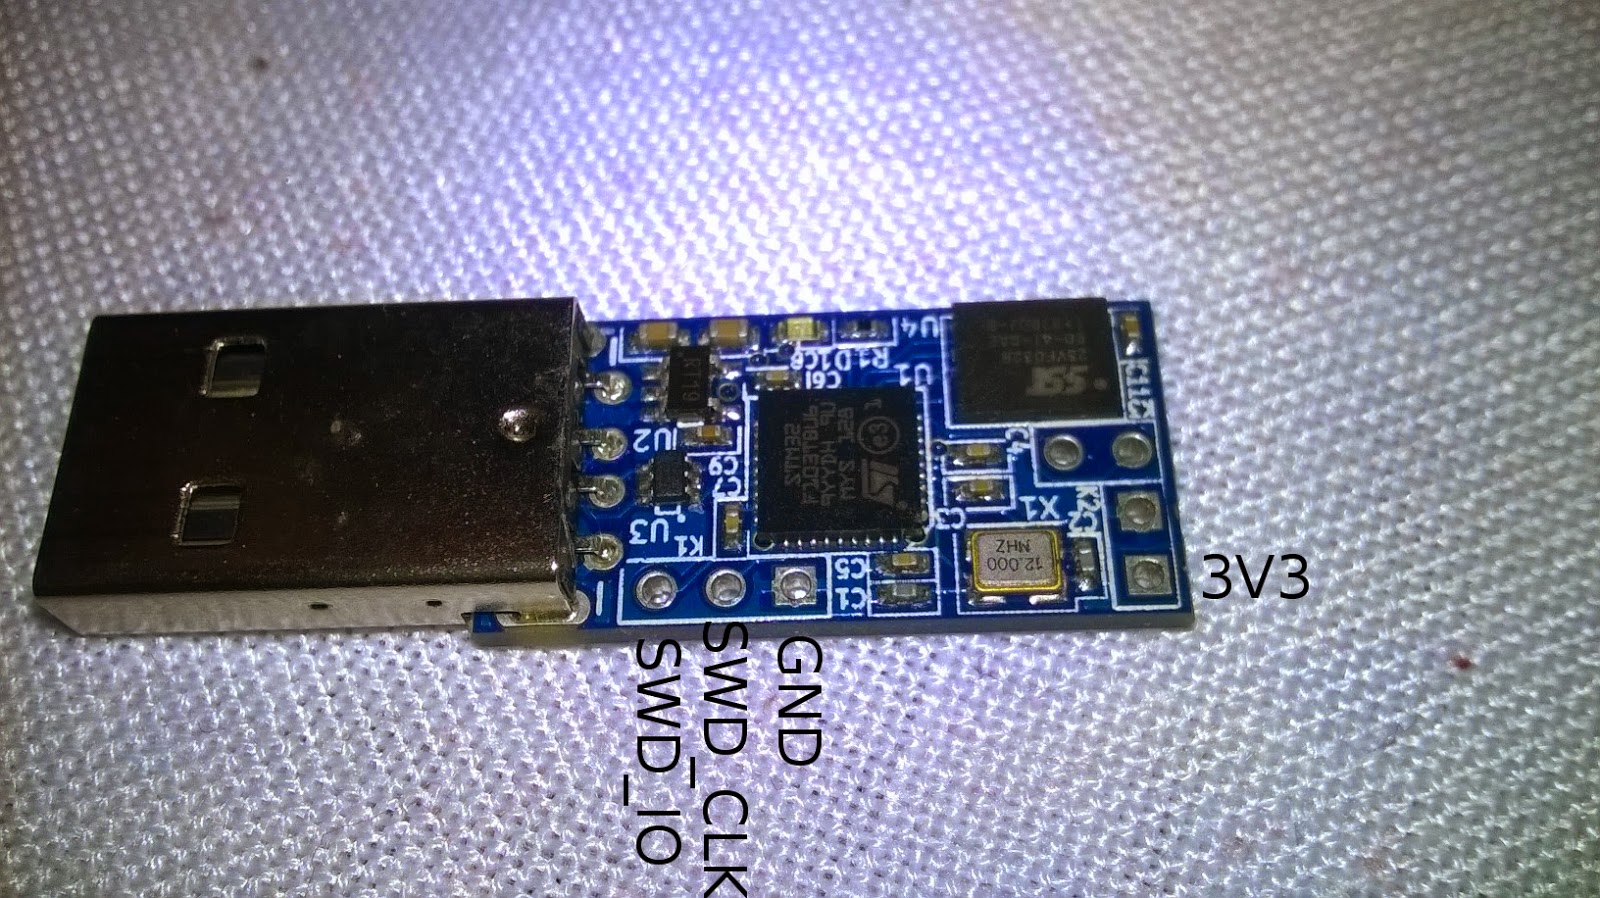
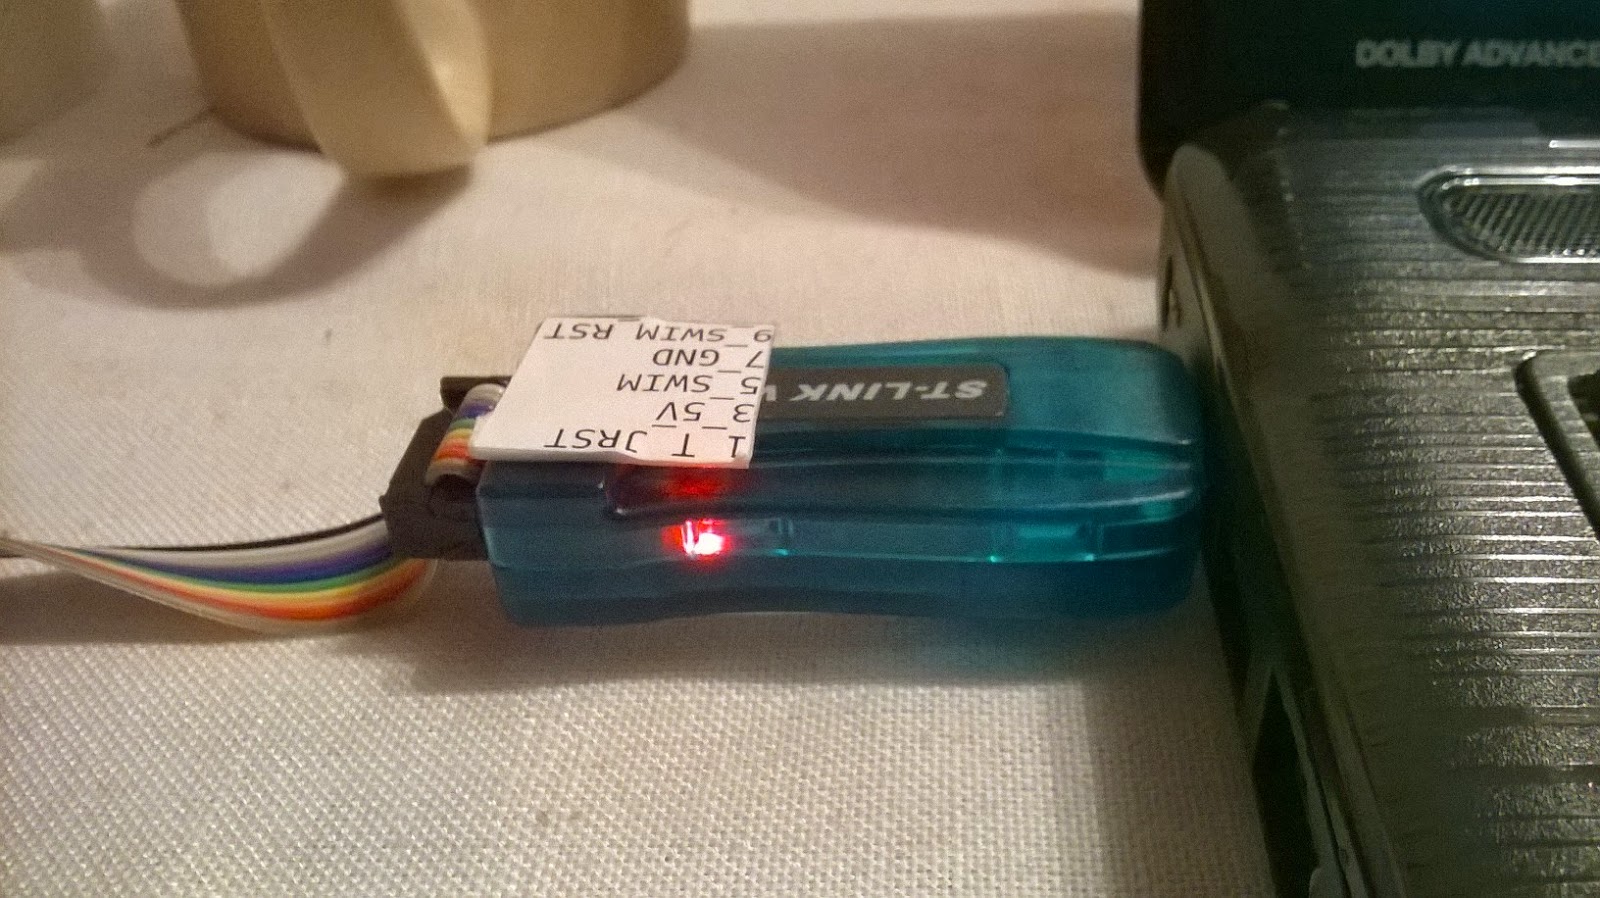
This .elf file is the one we will actually write to our FST-01 device. Before flashing the device, obviously we have to connect the interface to the device, and this is I connected mine:
- Let's identify the connections before doing anything else:
- Now that we know where goes what let's connect the cables:
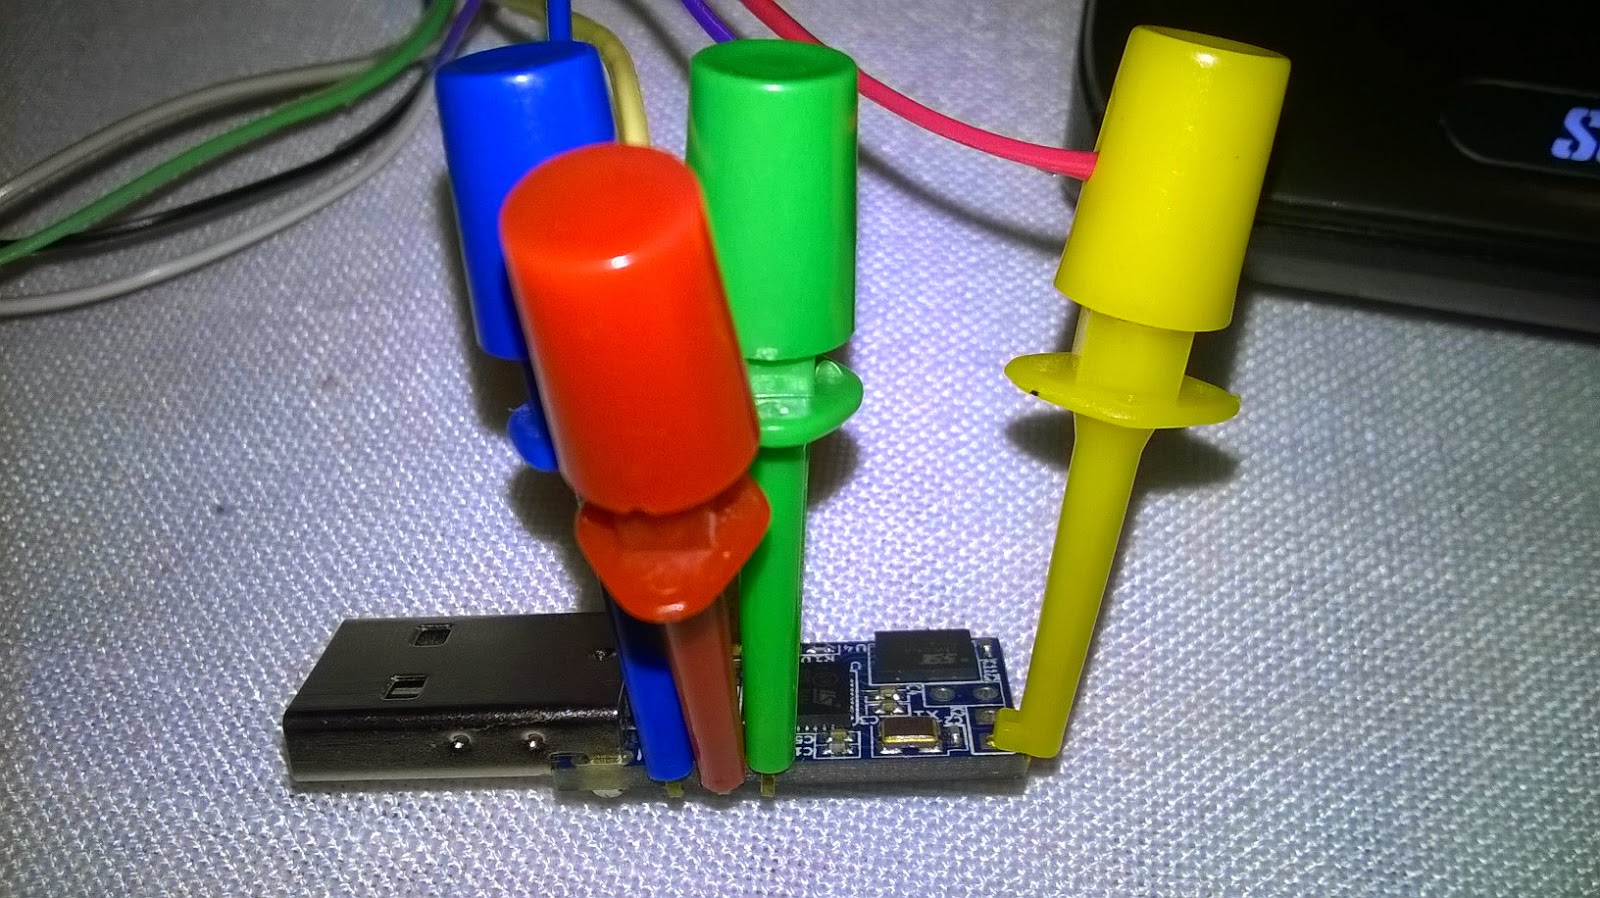
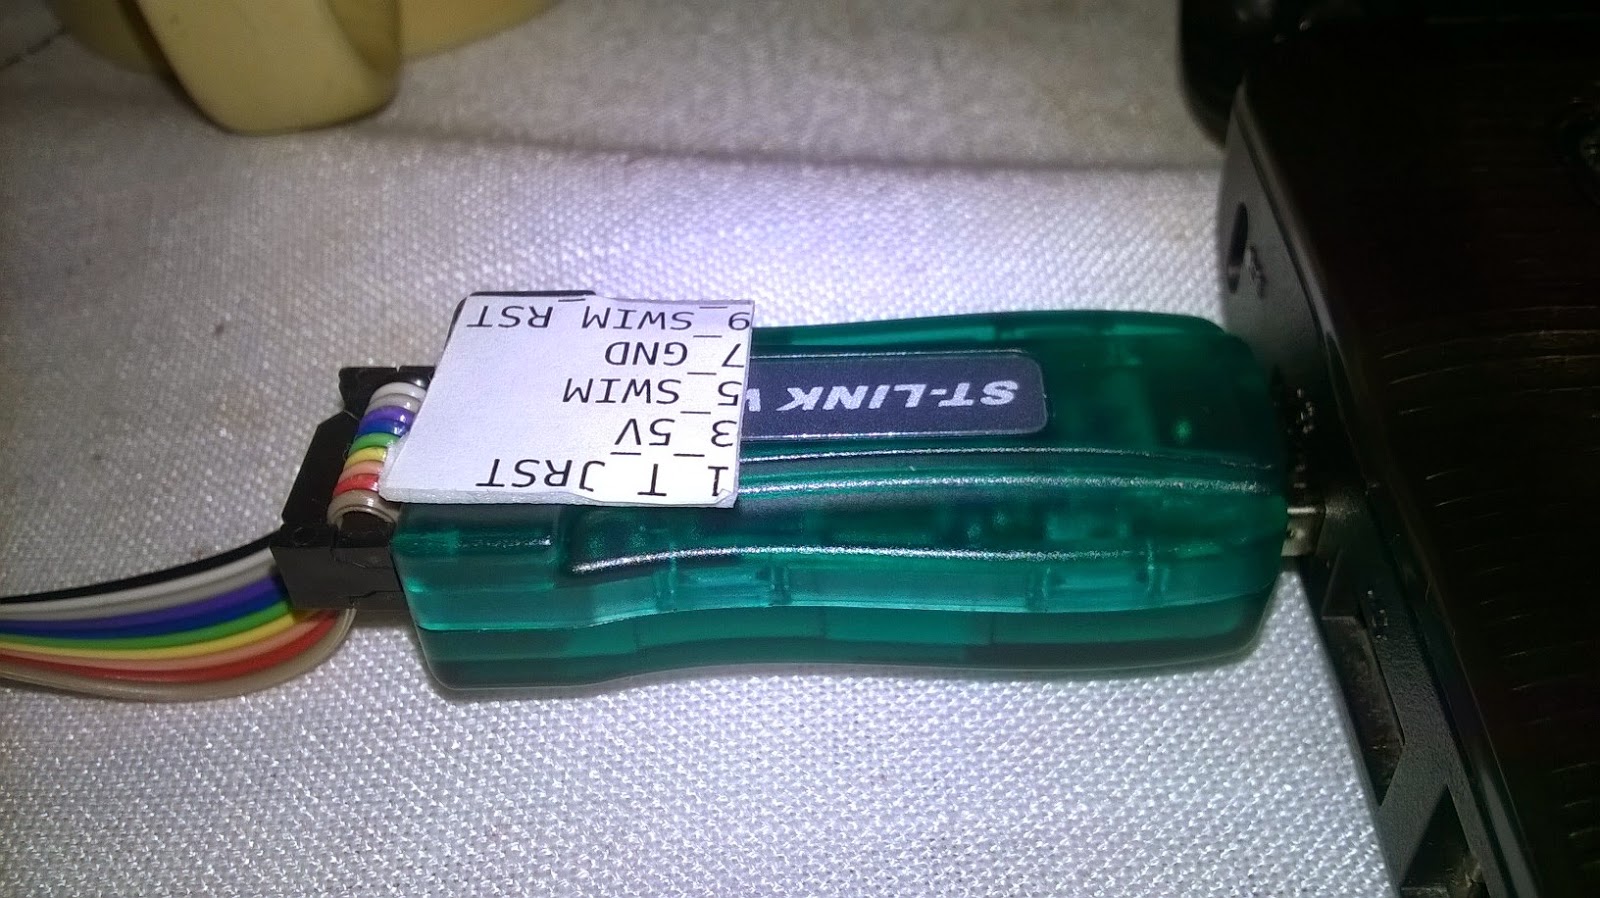
- With all cables connected we can now plug our ST-LINK/V2 clone interface to the usb port:
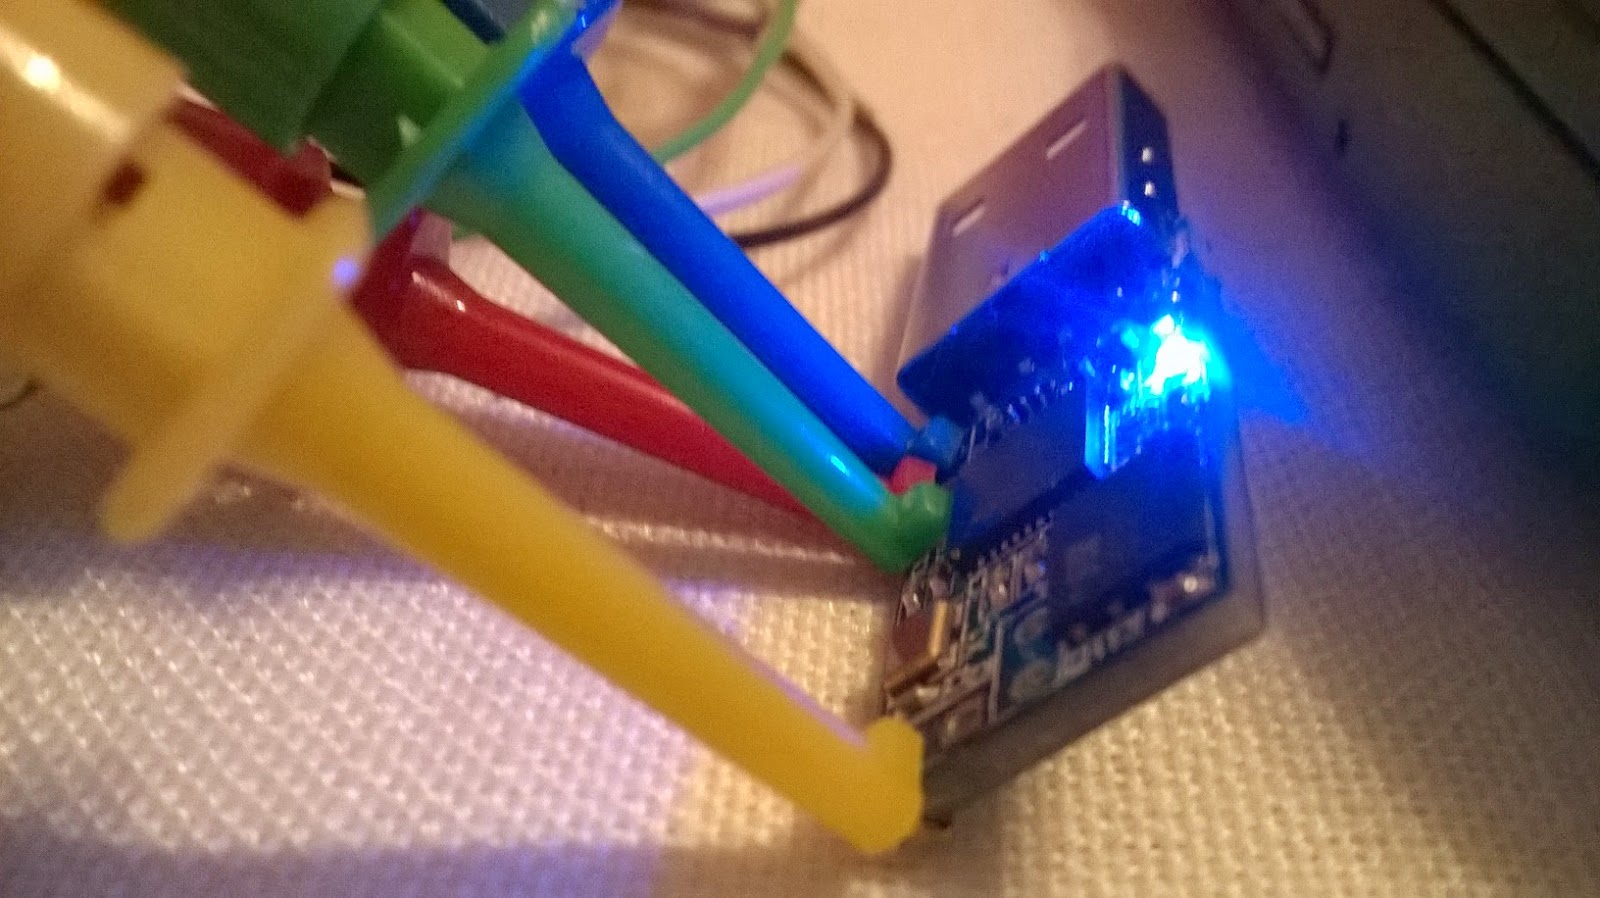
- You will know that it was plugged because as soon as you do it FST-01 LED will be turned on:
- Once you start using ST-Link/V2 either with OPENOCD or with the GnuK scripts a red led will be turned on, and when if it flashes it means data is being transmitted to the connected device:
From this point we have two paths we can follow to get the FST-01 programmed, the first with OPENOCD and flashing it manually and the other is using some scripts that are provided on the GnuK repository, I will explain both.
Flashing FST-01 manually using ST-Link/V2 and OPENOCD
Once we execute OPENOCD it will open a port (4444 by default) that we should connect with a terminal client (telnet in our case) and from there we can interact with the interface to get it programmed.
So let's start by executing OPENOCD (notice that the files I'm using are one for the interface and the other for the processor being programmed, it you are using other than ST-Link/V2 notice that probably you will use a file different than interfacstlink-v2.cfg):
$ sudo openocd -f interfacstlink-v2.cfg -f target/stm32f1x_stlink.cfg
Now that OPENOCD is running let's get into its interactive console with telnet:
$ telnet localhost 4444
Trying 127.0.0.1...
Connected to localhost.
Escape character is '^]'.
Open On-Chip Debugger
So we are on the interactive console now, as we (through the interface) powered the processor on the FST-01 it is executing as it would normally do, so now we have to stop that program and unlock the STM32 so it can be written:
> reset halt
target state: halted
target halted due to debug-request, current mode: Thread
xPSR: 0x01000000 pc: 0x080001b0 msp: 0x20005000

> stm32f1x unlock 0
device id = 0x20036410
flash size = 5164kbytes
Device Security Bit Set
target state: halted
target halted due to breakpoint, current mode: Thread
xPSR: 0x61000000 pc: 0x2000003a msp: 0x20005000
stm32x unlocked.
INFO: a reset or power cycle is required for the new settings to take effect.
It is now unlocked, as mentioned by the interface a power cycle is required, so let's trigger a reset and then halt the running program again:
> reset

> reset halt
target state: halted
target halted due to debug-request, current mode: Thread
xPSR: 0x01000000 pc: 0xfffffffe msp: 0xfffffffc
And finally, let's write the elf to the processor and get this done:
> flash write_image erase /home/dmarciano/Downloads/gnuk/src/build/gnuk.elf
auto erase enabled
target state: halted
target halted due to breakpoint, current mode: Thread
xPSR: 0x61000000 pc: 0x2000003a msp: 0xfffffffc
wrote 64512 bytes from file /home/dmarciano/Downloads/gnuk/src/build/gnuk.elf in 3.551985s (17.737 KiB/s)
> reset
> exit
Done! You are ready now to unplug everything, close OPENOCD, assemble FST-01 into its nice and small case (If you have one) and use it as brand new (there are two checks you could perform to be sure it was written successfully described below).
Flashing FST-01 using GnuK scripts
This is even easier than using OPENOCD manually, in this case instead of using the elf file we will be using the bin compiled file. GnuK provides a set of scripts to automate flashing the binaries to FST-01, we will use stlinkv2.py to automatically flash gnuk.bin of the STM32.
The scripts are located in a directory called "tool":
$ cd ./gnuk/tool/
There you will see a file called "stlinkv2.py" that is the one created for ST-Link/V2 (Pretty obvious, huh?).
We will start by erasing the content of the STM32:
$ sudo python stlinkv2.py -e
ST-Link/V2 version info: 2 17 4
Change ST-Link/V2 mode 0002 -> 0001
Status is 0081
CORE: 1ba01477, CHIP_ID: 20036410
Flash ROM read protection: off
Option bytes: 00ff5aa5
Flash ROM blank check: False
SPI Flash ROM ID: bf254a
ERASE ALL
SUCCESS
Programming the binary to the STM32 with this script is super easy and requires only one line:
$ sudo python stlinkv2.py ../src/build/gnuk.bin
ST-Link/V2 version info: 2 17 4
Change ST-Link/V2 mode 0002 -> 0001
Status is 0081
CORE: 1ba01477, CHIP_ID: 20036410
Flash ROM read protection: off
Option bytes: 00ff5aa5
SPI Flash ROM ID: bf254a
WRITE
VERIFY
PROTECT
Flash ROM read protection enabled.  Reset the board to enable protection.
SUCCESS
Done, again it is flashed and you can unplug everything, assemble and use.
Checks to verify it was programmed correctly
Now, that you have your FST-01 programmed there are a few tests you could perform to check if it was programmed correctly. This first is to check if it is recognized by the OS with the USB ID you stated when compiling the binary, the second test will be to check that gpg recognizes the device and it has still no data:
To check if the USB was recognized we can use lsusb:
$ lsusb
Bus 002 Device 002: ID 8087:0024 Intel Corp. Integrated Rate Matching Hub
Bus 002 Device 001: ID 1d6b:0002 Linux Foundation 2.0 root hub
Bus 004 Device 001: ID 1d6b:0003 Linux Foundation 3.0 root hub
Bus 003 Device 006: ID 234b:0000
Bus 003 Device 001: ID 1d6b:0002 Linux Foundation 2.0 root hub
Bus 001 Device 003: ID 04f2:b1e4 Chicony Electronics Co., Ltd
Bus 001 Device 002: ID 8087:0024 Intel Corp. Integrated Rate Matching Hub
Bus 001 Device 001: ID 1d6b:0002 Linux Foundation 2.0 root hub
As you can see on that list the device 006 at bus 003 has the ID 234b:0000, and if you recall that's the one we used when we compiled this binary.
Checking the device with GPG is super easy too! Just one command:
$ gpg --card-status
Application ID ...: D276000124010200FFFE50FF73060000
Version ..........: 2.0
Manufacturer .....: unmanaged S/N range
Serial number ....: 50FF7306
Name of cardholder: [not set]
Language prefs ...: [not set]
Sex ..............: unspecified
URL of public key : [not set]
Login data .......: [not set]
Signature PIN ....: forced
Key attributes ...: 2048R 2048R 2048R
Max. PIN lengths .: 127 127 127
PIN retry counter : 3 3 3
Signature counter : 0
Signature key ....: [none]
Encryption key....: [none]
Authentication key: [none]
General key info..: [none]
You're ready to enjoy your FST-01 based GnuK again!
References and useful links: